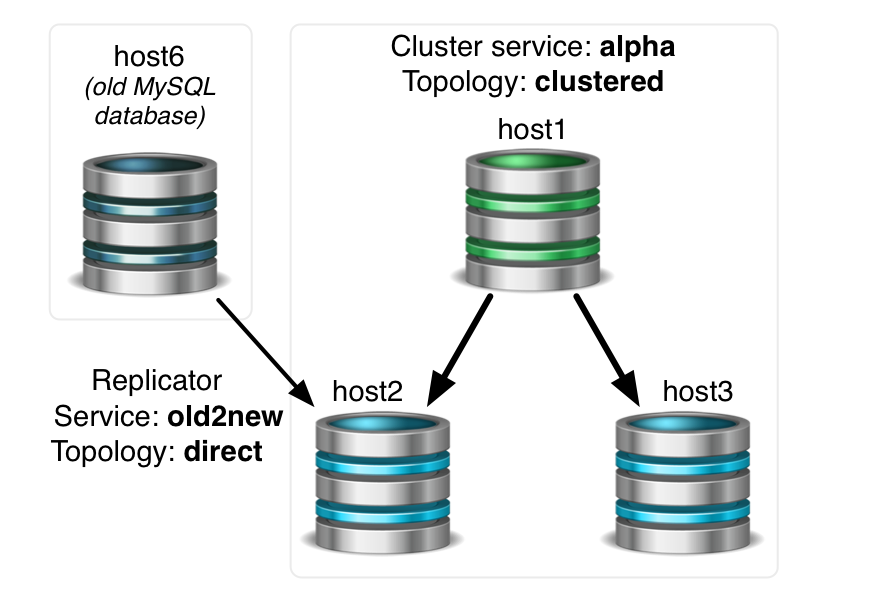
The Tungsten Replicator is an extraordinarily powerful and flexible tool capable of moving vast volumes of data from source to target.
In this blog post we will discuss the basics of how to deploy the Tungsten Replicator to pull events from an existing MySQL standalone database into a new cluster during a migration. We nicknamed this replication service "old2new". In the old2new case, the topology would be direct, and there would be only one install of Tungsten Replicator acting as both extractor and applier.
What's Happening Here?
This procedure often happens during a new install of the Tungsten Clustering software.
The proper order of events would be:
- backup the old database, recording the binary log position the backup was taken at. This assumes no MyISAM tables, only InnoDB.
- Restore the database dump to all nodes in the new cluster.
- Install the Tungsten Clustering software.
- Install the standalone tungsten Replicator software to pull from the old database and apply to the new cluster via the Tungsten Connector.
Out With the Old
For step 1, we need to extract the data from the old server.
shell> mysqldump -u tungsten -psecret --opt --single-transaction --all-databases --add-drop-database --master-data=2 > backup.sql
shell> head -50 backup.sql | grep MASTER_LOG_POS
-- CHANGE MASTER TO MASTER_LOG_FILE='mysql-bin.000002', MASTER_LOG_POS=7599481;
While we are here on the old database server, let's ensure that MySQL has been configured to allow for the Tungsten Replicator to read events. For example:
mysql> drop user tungsten;
mysql> CREATE USER tungsten@'%' IDENTIFIED BY 'secret';
mysql> GRANT RELOAD, REPLICATION SLAVE, REPLICATION CLIENT ON *.* TO 'tungsten'@'%';
In With the New - Restore
In Step 2, we simply want to restore the entire dump to each of the new cluster nodes:
shell> mysql -uroot -pverysecret < backup.sqlIn With the New - Install the Cluster
In Step 3, install the cluster software on all three nodes:
shell> sudo su - tungsten
shell> vim /etc/tungsten/tungsten.ini
[defaults]
user=tungsten
install-directory=/opt/continuent
replication-user=tungsten
replication-password=secret
replication-port=13306
application-user=app_user
application-password=secret
application-port=3306
start-and-report=true
profile-script=~/.bash_profile
[alpha]
topology=clustered
master=host1
members=host1,host2,host3
connectors=host1,host2,host3shell> cd /opt/continuent/software/
shell> tar xvzf tungsten-clustering-6.0.3-599.tar.gz
shell> cd /opt/continuent/software/tungsten-clustering-6.0.3-599/
shell> tools/tpm install -i
shell> source /opt/continuent/share/env.sh
shell> echo ls | cctrlAt this point, the cluster should up and running!
Click here for the Cluster install documentation.
There Can Be Only One - Install the old2new Replicator
Last, but not least, the old2new standalone Replicator service must be installed.
The Replicator may be installed on any host that has access to the configured port on the Connector node (i.e. 3306).
For our examples, we will select one cluster node to install the old2new replicator service upon, slave host2.
All writes to the Connector on host2 will be directed to the current master server in the cluster (host1 in our example).
Add the following to the INI file of the host you are installing the old2new replicator on.
shell> sudo su - tungsten
shell> vim /etc/tungsten/tungsten.ini
[defaults.replicator]
install-directory=/opt/replicator
rmi-port=10002
thl-port=2113
executable-prefix=mm
[old2new]
skip-validation-check=MySQLApplierPortCheck
skip-validation-check=MySQLNoMySQLReplicationCheck
log-slave-updates=true
direct-datasource-host=host6
direct-datasource-port=13306
direct-datasource-user=tungsten
direct-datasource-password=secret
topology=direct
master=host2
replication-port=3306
start=false
start-and-report=false
If you are not using Bridge mode, then you also need to configure the user.map file to inform the Tungsten Connector about the replication user which will connect to the cluster to apply events from the old database server. For example, on host db2:
shell> vim /opt/continuent/tungsten/tungsten-connector/conf/user.map
tungsten secret alpha
No connector restart is needed after editing user.map.
shell> cd /opt/continuent/software/
shell> tar xvzf tungsten-replicator-6.0.3-599.tar.gz
shell> cd /opt/continuent/software/tungsten-replicator-6.0.3-599/
shell> tools/tpm install -i
shell> source /opt/replicator/share/env.sh
shell> mmreplicator start offline
shell> mmtrepctl status
At this point, the Tungsten Replicator should up and running, but in the OFFLINE:NORMAL state.
Back in Step 1, we recorded the master log position:
shell> head -50 backup.sql | grep MASTER_LOG_POS
-- CHANGE MASTER TO MASTER_LOG_FILE='mysql-bin.000002', MASTER_LOG_POS=7599481;
We must use that information to construct the proper command which will signal the old2new service where to pick up after the backup left off.
shell> /opt/replicator/tungsten/tungsten-replicator/bin/tungsten_set_position --replicate-statements --offline --online --seqno=0 --epoch=0 --service=old2new --source-id=host6 --event-id=mysql-bin.000002:7599481
shell> mmtrepctl status
At this point, the old2new Tungsten Replicator service should up and running!
Click here for the old2new Direct Replication install documentation.
Return the Favor
It is also possible to feed data back into the old system after a migration. We nicknamed that replication service "new2old". In the new2old case, the topology would be cluster-slave.
This will be covered in detail in a future blog post.
Click here for the new2old Cluster-Slave Replication install documentation.
Wrap-Up
For more details about using the standalone Tungsten Replicator, please visit our documentation.
We will continue to cover topics of interest in our next "Mastering Tungsten Replicator Series" post... stay tuned!
Click here for more online information about Continuent solutions.
Want to learn more or run a POC? Contact us.


Comments
Add new comment